Hey guys! I just dyed my hair not to long ago, so I decided to make a little tutorial.
Please note, this is for BRIGHT hair. I did mine green!
Tools:
1. A plastic bag. Make sure it's big enough to cover your hair!
2. Tin foil. I don't actually use any in this, but it can be used for highlights, if you want them.
3. Hair clips. For separating. (Hair ties can be used too.)
4. Brushes. Mix colors and can be used for application.
5. Gloves. Protect your hands!
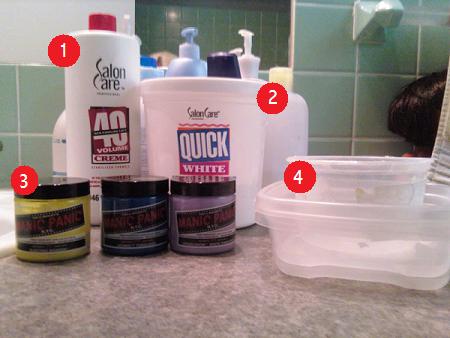
Dye
1. Developer. I use 40 volume, because I have naturally dark hair (and I know how to use bleach and not kill myself), but I suggest you use 30 volume, maybe even 20. Only use the strong stuff if you know what you're doing!
2. Lightener. Mixes with the developer to make bleach! I use white, but other colors can be used to.
3. Colors! Manic Panic brand here, but in all honesty, I don't like it very much. We've got some toner on the end, as well.
4. Plastic mixing bowls. These are actually just Tupperware... But you can use fancy ones, too.
Tip: Wear a T-shirt you don't care about!
You're PROBABLY going to get bleach and hair dye on your shirt. Wear one you don't care about this happening to!
Also, use a towel that can get dyed. This is mine:
Step 1: Mix the Bleach.
Mixing bleach is easy. Simply put scoops of lightener in a small non-metallic bowl. Your lightener should come with a scoop if in a barrel, but you can also buy pre-measured packets. A couple scoops should do, depending on how much hair your bleaching. Then, pour in the developer and mix! Keep in mind, if it's too thick or runny, just add more lightener or developer until it's creamy.
It should look something like this.
Step 2: Separate the hair and bleach!
If your bleaching your whole head, there's no need to pre-separate your hair. Just remember to go in sections. If you have a lot, you may want to section hair. If you're not, separate out the hair you don't want bleached.
Now, I'm only re-doing my roots. But, this goes for full bleaching as well. First, take a thin section...
And, using your application brush, or your GLOVED hands, apply bleach. Repeat over your whole head!
Clip off sections as you go, like so:
When your finished, you should look something like this:
And now, wait NO LONGER than 90 minutes, until your hair is the shade you want. Generally, you'll be able to see the progress very easily, and feel free to wash a small section with water to check the progress if needed. Usually, an hour (for longer, darker hair) will be enough. For shorter/lighter hair, half an hour is usually enough. Just play it by eye.
Tip: Your head WILL itch. Use something like a toothpick if you need to itch!
Step 4: Wash the Bleach.
Using a pH balanced shampoo, wash your hair. If you're not doing color, use conditioner. But, if you are dying your hair, I suggest you avoid it.
This stuff is magic. Ion Color Solutions shampoo and conditioner.
Don't dry your hair! Wet hair works just fine.
Step 5: Color!
Put your color in a non-metallic bowl (or, if your not mixing, and it's in a jar-like container, just... open it). Mix and colors as needed.
Seperate your hair as needed.
Have at it with colors! Use application brushes or your hands, whatever your comfortable with.
Note: While gloves are nice at this point, they're not needed. You'll just have colorful hands for a few days. (You can just wash the gloved you used to bleach, they're reusable!)
As you go, clip up colored sections.
Once done, put the bag on your head. It's silly, but DO IT. It'll help set the color.
Now, use a handy-dandy hair dryer and blow dry your pretty, bad covered head. Heat helps the color become VIBRANT! (You don't have to do this the entire time, just every once in a while as you wait.)
Leave the color in for 20-30 minutes, then wash out with water until it runs clean.
Step 6: Finish!
Yaaay, you're done! Now, if you don't like it, or want to add more color, simply repeat step 5. I didn't like this, so I added green.
Now, be careful with how you care for your hair. Use color-friendly shampoo's, avoid hot water, and only wash your hair every couple of days. Do NOT wash your hair for at least 48 hours after dying. Depending on the color, you will probably have to re-do your hair every couple of weeks.
That's all! Hope this helps!